Thursday, March 28, 2013
Monday, March 25, 2013
How you can Configure a Linksys Router
The content expects to explain the process of setting up a Linksys router. The instructions happen to be complied inside a easy and simple to know manner. However, it's still advised that customers follow and implement these instructions because they are. Doing this helps you to save them from having problems and therefore calling up Linksys router support for help.
Do you want help setting up your Linksys router? Well, you might need to configure Linksys router for wireless connection, DSL connection, firewall, or being an entry way or switch etc. Although it is simpler to do the router configuration than every other task, you might still face difficulty in addition. Don't be concerned! The below pointed out guide can help you carry out the configuration process by yourself, therefore sidelining the necessity of getting in touch with Linksys tech support team.
Instructions:
For DSL Connection:
First make sure that you come with an active web connection, a legitimate password for that DSL account, and also the current email address and password out of your isp (Web service provider). Also be sure that the internet works once you create a wired connection of the computer towards the DSL modem.
When done checking, disconnect all of the products including computer mounted on your Linksys router and difficult totally reset it utilizing a sharp, thin pin. Place the pin in to the Totally reset hole (is going to be situated the rear of the router), press it and hold it for 7-ten seconds. The lights will flicker once, rebuilding the router to default configurations. It should be noted that your set up configurations is going to be lost after resetting the router.
Wait for a router to show on (the energy light ought to be steady eco-friendly). Connect your DSL modem towards the router's internet port (situated behind). Now reunite your computer towards the the 4 LAN ports from the router. When connected correctly, the related lights around the router will illuminate.
Connect to the web otherwise connected instantly after activating the pc. Open your internet browser and kind '192.168.1.1' (without quotes and out of the box) within the address bar. Hit Enter around the keyboard to go to the
When motivated for any password, type these within the relevant boxes after which click the Login button or rather press Enter to proceed. Look at your router documents if you're unclear about the login qualifications.
When drenched to the router interface, click the Setup tab, choose PPPoE in the dropdown menu alongside Web Connection Type and enter your password provided by Web service provider within the relevant fields. Click to create the Keep Alive Radial Period choice to thirty seconds after which click the Save Configurations button.
Click the Status tab and appearance regardless if you are connected or otherwise. Should you not connected, then hit the Connect button. If connected, go to configure your router as preferred for wireless configurations. Otherwise connected, choose the Setup tab again and select Automatic Configuration DHCP in the dropdown list beside Web Connection Type. Click the Save Configurations button and exit the router interface. Don't exit the interface if you wish to configure the wireless configurations.
For Wireless Connection:
Click the Wireless tab (around the router's interface) and personalize your wireless network configurations. Provide a title for your wireless network like 'home' (any title of your liking), choose the funnel no. in the dropdown menu, and click on to allow the Wireless SSID broadcast. The suggested channels for that router are 1, 6, and 11. Click Save Configurations in order to save the alterations.
Click the Wireless tab again after which choose Wireless Security. Choose WEP or WPA Pre-Shared Key based on which kind of security your wireless adapter supports. For WEP, enter any passphrase after which click Generate to get the WEP security key. Make a note of the important thing on the sheet of paper and it safe because you will want it for connecting the very first time. For WPA, just enter your pre-shared key. You have to note it lower on the sheet of paper while you would want it connect with the wireless connection. Click the Save Configurations button.
Highlight the Setup tab again and visit the Local Ip box. Type '192.168.2.1' after which click Save Configurations in order to save the alterations. Energy cycle all of the products viz. router, modem, and computer and wait for minute. Turn the products on and fasten to wireless connection on the pc(s) while using network security key (WEP or WPA).
Additional Tips:
If you're not able to browse easily, make certain that the web browser isn't running any proxy server.
Saturday, March 23, 2013
How to purchase a Belkin Router's Ip
The content expects to describe the process for locating a Belkin router's Ip. The instructions put together listed here are reliable and proper up to now. However, we advise you to definitely follow them carefully to prevent having troubles.
An Online Protocol (IP) address is really a number designated to every computer and router to talk with one another or any other such products online. The address allows you to definitely sign in for your Belkin router, setup port sending or wireless networking etc., or modify your overall configurations amongst other things. You will find two kinds of addresses viz. static and dynamic. You are able to opt for each one in your Belkin router. The below pointed out tips can help you discover the Ip of the Belkin router.
Instructions:
The default Ip for any Belkin router is 192.168.2.1. The amount usually comes incorporated within the original Belkin router support documents viz. instruction manuals and login particulars and Belkin router setup media (installation disk), packed within the Belkin router package. It could happen that you simply misplace your Belkin package and end up forgetting your Ip too but you just wish to sign in for your router to allow certain features like firewall or parental control urgently. This informative guide comes handy in this situation. It informs the methods for logging to your router and designing it.
Open the Run program from the beginning menu. Type 'cmd' (without quotes) striking Enter. Alternatively, you are able to browse towards the Start menu> All Programs> Add-ons> Command Prompt. Within the Command Prompt window, type 'ipconfig' without quotes striking Enter. It'll mention the Ip along with other particulars of the computer and router. There pops up particulars like 'Ethernet adapter Neighborhood Connection: Address, Subnet Mask, and Default Gateway' showing different amounts separated with three periods against each heading. Consider the amounts before Default Gateway they are with each other known as the Ip of the Belkin router. The Ip is the one which your pc is recognized to.
For those who have a radio connection set up on your pc, you will notice particulars like 'Wireless LAN adapter Wireless Networking Connection: Ip, Subnet Mask, and Default Gateway'. Similarly, your Belkin router is going to be recognized automatically Gateway, as the address will identify your wireless connection. When you're done making some the particulars, exit the Command Prompt window.
If you're a Home windows Vista or Home windows 7 user and you're simply not able to locate Run and therefore open Command Prompt, make use of this method. Type the cmd command within the Start Search area and don't press Enter. It'll show cmd.exe within the search engine results. Choose this program and open it up. Rather than this, you are able to browse to begin menu> All Programs> Add-ons> Command Prompt (like Home windows XP) to spread out Command Prompt. When done, type the ipconfig command and appearance your Ip. You are able to write lower the address particulars on the sheet of paper if that's the case preferred. You'll have liberty from learning them. You are able to go into the particulars easily while setting up port sending or entry way etc.
Another method of checking your Ip would be to run the traceroute command. Open Command Prompt (begin to see the above pointed out technique of opening the utility) and kind 'tracert ' (without quotes) striking the Enter key. The very first increase the risk for particulars would be the address of the Belkin router. The domain title is any website's title that's accustomed to test its route in the router. You can look at any domain's title to create in the Ip. For instance, type 'tracert gmail.com' striking Enter. The very first result in most the particulars will probably be your Belkin router's address.
Additional Tips:
You may also online look at your router's address. You will find various websites that instantly appear your Ip whenever you browse for them.
In case your Ip doesn't work or gives a mistake message whenever you come in to configure some feature in your Belkin router, energy off your pc and router. If there's a DSL modem connected involving the router and computer, shut it lower too. If still the Ip doesn't work, hard totally reset your router. Be careful as hard resetting the router will erase all of your existing designs and restore it towards the factory configurations.
Thursday, March 21, 2013
Linksys WMB54G Vista Setup - How to Configure Wireless Music Bridge to Work With Your Computer
Streaming music from your computer speakers wirelessly via wi-fi sounds like a great idea and it is but if you purchased a Linksys WMB54G and tried setting it up on your Vista machine, chances are you gave up and threw the device out the window. Thanks to Google and some trial and error, I figured out how to get this "non-Vista" device working on a Vista computer.
It's amazing to me that Linksys didn't make this device Vista compatible but I am not here to write about that. Instead, I will show you step by step how to get this wireless music bridge to work on your computer.
1. Throw the CD that came with the unit out! If you happen to run the software on your computer, you will have more problems than you can image.
IMPORTANT - The utility program is registry heavy so if you installed the old version that came on the CD, you will most likely have issues even if you UN-install it and install the new version. I had to do a system restore and restored my system prior to installing the original utility program.
2. Go to Linksys Drivers and download
XP, Vista Setup Wizard (XP and Vista) Ver.2.18
XP, Vista Firmware (XP and Vista) Ver.2.18
3. Connect the wireless music bridge directly into the Ethernet port of your computer - NOT into your router (you will loose Internet connection unless you are using wireless so print this page in case you need to come back to these directions.
4. Run the firmware program - it's pretty self explanatory - make sure the device is plugged into the wall and your computer and do not interrupt the process. The new firmware version should be 2.18
5. Once the firmware is upgraded, run the installation program by double clicking on the "setup" file.
6. Click where it says "Click here to start" - this will detect the bridge connected to your Ethernet port. Once connected, you can add a password, change the name and set it up to be seen on your wireless network.
*If you use WPA or WPA2 security in your network, it is the equivalent to PSK and PSK-2 in the Linksys setup so just be aware that you will not see anything about WPA
7. Once the device is all configured, it will ask you to install the utility which is the program that runs on your computer that sends the audio to the device. Follow the on screen prompts and install the utility. You will probably get an error after installing the utility because it will not run on Vista as is - just close the error message and continue.
8. After everything is installed, you can disconnect the Ethernet cable from your computer.
HERE IS THE IMPORTANT PART TO GET IT WORKING IN VISTA
9. Click on Start and type in "msconfig" where it says "start search".
10. Click on the startup tab and find "CMflywave Application" - uncheck the box to the left of it and click OK.
11. Find these three files on your hard drive:
cmas2ds.exe
cmflywav.exe
wmb54g.exe
(look for them inside the linksys install folder in program files)
12. Right-click on each of these files and go to properties - Then find the compatibility tab and check the box where it says "Run this program in compatibility mode for: and select (Windows XP Service Pack 2) and then click OK.
13. Now, double click on these 3 files in this order:
cmas2ds.exe
cmflywav.exe
wmb54g.exe
The utility should now run successfully in Vista. Click on "Scan for music bridge" and your device will show up in the list. Click on the device and click "connect" and now all your audio will be sent to the bridge.
....................................................................................................................................
So a few days went by and all of a sudden, the music was not being transferred to the wireless bridge. I do not know if I reboot or what but now whether the bridge showed as connected or not, the music was just coming out of the computer speakers.
What I did then was go to my sound settings and right click on the active device for the computer speakers - I then disabled them.
Next I reboot the computer and when it came back up, I verified that the computer speakers were disabled. I then went to the Linksys folder and double clicked on cmflywav.exe and wmb54g.exe (NOT cmas2ds.exe)
The bridge was able to connect and the music transferred.
In conclusion, this device was more headache than it was worth. I paid with shipping for a refurbished model and all the hours wasted trying to get it to work were not worth the money I saved on the device. If you are not a tech savvy person, this device is NOT for you. Linksys needs to get on the ball and resolve all the software issues with the WMB54G.
Monday, March 18, 2013
Motorola 2247-N8 Wireless DSL Modem by Motorola

In the period full of awesome gadgets that are meant to make how we live better, it could be challenging to imagine that everything new as well as significantly improved upon may come along. Motorola is here to inform you that not only have we created a brand new Motorola 2247-N8 Wireless DSL Modem for you, but that what we have formulated will setback competition aside. No time before has anyone created this sort of amazingly useful item and now we will provide the chance to aquire one for your self.
Just like you well noticed it takes more than just stating that something is both new or maybe improved upon to make it so. We grasped this as we started to create our new Motorola 2247-N8 Wireless DSL Modem and also were driven to be certain that it's anything you could possibly actually want. We set out to create a product that would not just be greater than everything our rivals have on this marketplace, but could leave them so far behind there's no way they can even come near to catching up.
Now you know our Motorola 2247-N8 Wireless DSL Modem has been positioned as the greatest on the market, what things can we potentially do in order to make it better yet? For starters we've added in quite a few extra features which none of the others in the marketplace appear to have even thought of. However, since the accurate indication of a excellent product is in delivering authentic bang for your buck, we've set the value so extremely low that they are flying off the shelves.

You Save : Check Cheap Price
Check Offer listing
Motorola Netopia 2247-N8 Wireless Router - IEEE 802.11n 579765-003-00 Routers & Gateways - Wireless
Feature
- And convenient package?making it the perfect networking solution for the home, home office, or small business
- Assures advanced Quality of Service (QoS) for Wi-Fi delivery of Voice-over-IP (VoIP), IPTV, and streaming broadcast-quality video.
Sunday, March 17, 2013
Remote viewing setup on cisco wvc80n
Saturday, March 16, 2013
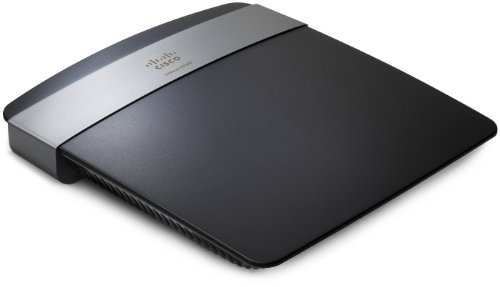
Linksys E2500 Advanced Simultaneous Dual-Band Wireless-N Router by Cisco
Currently Feature the newest Linksys E2500 Advanced Simultaneous Dual-Band Wireless-N Router From Cisco
It truly is with great satisfaction which we are able to announce the fact that we currently carry the newest Linksys E2500 Advanced Simultaneous Dual-Band Wireless-N Router provided by Cisco. Even though there a wide range of styles exactly like it, you are going to see that none of them will offer you just as much value for your money as the newest design through such a highly regarded company. Only if you pay for a highly suggested type exactly like it will you feel like your cash is well spent.
Now, what is it concerning this specific Linksys E2500 Advanced Simultaneous Dual-Band Wireless-N Router that places this in a class of its own? In this particular situation you are going to see that originating from such a well-known Cisco shows that you are choosing a product that has a good reputation for fine quality merchandise. Several other imitators appear and vanish leaving a pathway of unhappy purchasers, when you purchase one created by Cisco, you realize you can depend on constantly getting the finest quality merchandise accessible.
Not only are we pleased to have the ability to add the Linksys E2500 Advanced Simultaneous Dual-Band Wireless-N Router to our inventory of fantastic merchandise, but we are pleased to have the ability to provide this for you at this kind of great low price. You might be able to find this design elsewhere, but you're not likely to get them at the amazingly low price we've got the item on sale for as a result of our unique buying power. With a price which is this reduced, you are going to receive a great product and true value for your money.

You Save : Check Price Now
Check Offer listing
The Linksys E2500 offers superior wireless speed (up to 300 + 300 Mbps), optimal range, and powerful dual-band technology to provide advanced performance for active wireless households. Simultaneous dual-band (2.4 + 5 GHz) technology doubles your network bandwidth and helps avoid network interference, enabling smoother and faster media streaming and file transfers. A MIMO antenna array offers superior range and reliability. And WPA/WPA2 encryption and SPI firewall help keep your network protected. Plus, included Cisco Connect software gets you set up in three easy steps and offers powerful tools for ongoing management of your network.
Feature
- Enjoy the power of simultaneous dual-band Wireless-N (802.11n) technology with double the capacity for surfing the web
- Connect your computers, wireless printers, smartphones, and other wireless devices at up to 300 + 300 Mbps of transfer speed
- Double your network bandwidth with simultaneous dual bands (2.4 GHz and 5 GHz) to help avoid interference
- Enjoy the superior range provided by a MIMO antenna array
- Use four Fast Ethernet (10/100 Mbps) ports to directly connect wired devices
- Give visitors password-protected Internet access on a separate network so your visitors have access to the Internet
- Keep your network protected with customizable security settings, including WPA/WPA2 Personal and SPI firewall protection
- Set up your wireless network in three easy steps using included Cisco Connect software
Thursday, March 14, 2013
Linksys Wireless Router How To Install Setup Password on Mac Password Protect Network Name
Monday, March 11, 2013
Homewerks Radio Thermostat CT-30-H-K2 Wireless Thermostat with Wi-Fi Module, Dual Wireless Inputs and Touch Screen by Homewerks

You Save : Check Price Now
Check Offer listing
We Are Excited to At last Present You Our company's Hottest Homewerks Radio Thermostat CT-30-H-K2 Wireless Thermostat with Wi-Fi Module, Dual Wireless Inputs and Touch Screen
Everybody generally appears to be anticipating that certain unique item to come along which is going to modify the way we accomplish certain matters once and for all. The thing is that lots of them have come along and failed to measure up to the hype. This simply triggers discouragement if you have spent decent money for the Homewerks Radio Thermostat CT-30-H-K2 Wireless Thermostat with Wi-Fi Module, Dual Wireless Inputs and Touch Screen then comprehending that the merchandise isn't better than the one which came before.
That is why Homewerks is enthusiastic to present to you Our company's latest Homewerks Radio Thermostat CT-30-H-K2 Wireless Thermostat with Wi-Fi Module, Dual Wireless Inputs and Touch Screen. After many years of paying attention to what our buyers have had to say of the products already on the market, our company of developers went to work. Their purpose ended up being to absolutely duplicate the product from the start and make it into one that can more than meet the buzz, which for most of us is half the main cause they're buying something new.
As we completed producing the usual Homewerks Radio Thermostat CT-30-H-K2 Wireless Thermostat with Wi-Fi Module, Dual Wireless Inputs and Touch Screen, we then set about making it one that would give you authentic bang for your buck. The reasoning being that although most of the people don't mind paying for a decent fundamental item, we know you will love any additional details our developers have included to make our product to stand above the rest and make it really worth obtaining. While we recognize we could ask for much more for it, we've chosen to offer it to you at this super low price.

e5 Compatible CT-30 With WiFi: 7 Day Programmable Thermostat w Touchscreen, Dual Wireless Inputs, Includes 1 WiFi Power Module
Feature
- Sleek 7-day programmable thermostat with touchscreen controls
- Works with nearly any HVAC system--including traditional furnaces and heat pumps
- Designed for use with 3AA alkaline batteries and/or 24 volt AC C wire (or a 12-24 AC or DC source) and milli volt gas systems
- Can control up to 2 stages of heat and 2 stages of cool
- Able to program up to 4 independent periods per day
Sunday, March 10, 2013
Cisco WVC210 Wireless-G PTZ Internet Security Video Camera with 2 Way Audio by Cisco

You Save : Check Cheap Price
Check Offer listing
Cisco had been correcting all of the experiences and modified the high skills to produce this newest excellence item good for every residence. We have been delivering you and everyone essentially essentially the most efficient remedy with Cisco WVC210 Wireless-G PTZ Internet Security Video Camera with 2 Way Audio. Our most current item which can be in a position to respond your demand and it truly is out accessible out there now. We have been enhancing the intelligent capability and particulars that we found from every individual resource to determine essentially the most effective item notion end result for every residence.
According to the notion that is no one need to invest significantly money on a item that would not function nicely. This really is especially developed for buyers that are into it for good quality and cost. The company has worked with their group introduced this item towards the worldwide net market. To provide high-quality merchandise which delivers the significance of our lifetime is our process and component of our solutions that any individual paying for has every single appropriate to anticipate. We actually really feel very specific that Cisco WVC210 Wireless-G PTZ Internet Security Video Camera with 2 Way Audio will be the merchandise that you simply merely have been trying to discover lengthy time. And also this item is just not too precious for every individual.
Knowledge in our production sector produced Cisco WVC210 Wireless-G PTZ Internet Security Video Camera with 2 Way Audio will be the latest magnificent item from Cisco for your property.

Cisco WVC210 Wireless-G PTZ Internet Security Video Camera -w/2-Way Audio
Feature
- Former Linksys Business Series
- Sends high-quality live video to your network wirelessly
- Low-light sensitivity
- Simultaneous dual CODECs make an optimal combination of video viewing and storage
- Supports two-way audio, IP multicast, and 3GPP
Subscribe to:
Posts (Atom)